|
| |
What You Will Learn
After completing this lesson, you will be able to:
Additional Written Resources
 | How
to troubleshoot problems that occur when you start or use Word 2010,
Word 2007, Word 2003, or Word 2002 - Microsoft Support |
|
How to recover a lost file in Word 2007 or in Word 2003 - Microsoft
Support |
| Word for Law Firms by Payne
Consulting Group:
|
| Troubleshooting
Damaged Documents in Word 97 for Windows (Knowledge Base) (by e-mail)
Word
2000 |
| Document Corruption (another
chapter in this guide) |
|
Why is My Blank Document Not Blank? by Suzanne Barnhill, MVP |
| Why
Does the Appearance (or layout) of My Document Change When I Open It
On a Different Machine? Suzanne S. Barnhill, MVP |
| Word
is always making changes I don't expect. How can I get more control
over my formatting? by Suzanne S. Barnhill, MVP, and Dave Rado,
MVP. See also Chapter 6 of
Microsoft Word 2010 Bible by Herb Tyson,
MVP. |
|
How to put Word 2002 (and 2003) back the way they were in Word 97-2000
by Suzanne S. Barnhill, MVP |
| Page Numbers - See chapter on Sections /
Headers & Footers |
| Printing - How to Trouble Shoot Printing in Word - Microsoft
KnowledgeBase - Word
97, Word
2000, Word
2002 |
| What
Files Do I Need to Backup? (or where does Word store all my
customizations?) by Dave Rado, MVP and Brenda Hutton |
|
I Opened an Email Attachment in Word and Saved It - It's Gone by
Graham Mayor, MVP - This article says it is about Outlook attachments,
but it is about any email attachment. |
| How to
move/copy/share customizations including AutoText, AutoCorrect, Macros,
Toolbars and Key Assignments by Charles Kenyon |
| Automatic backup?
How can I make Word save or back up my document automatically? by
Suzanne S. Barnhill, MVP. |
| Automatically
Back Up Word Documents - including to two locations! by Graham
Mayor, MVP. |
| Problems with Add-Ins |
| I am asked if I want to
save changes to the template - but I didn't make any changes! |
| I can't save changes to
my defaults! |
| This
chapter in Word format |
|
This
chapter (unsupplemented) for Word 2002 in Word Format |
 
(this
guide table of contents) ------- (MS
Word New Users FAQ)
Changes in Word's Document Structure with Word 2007-2013
I have been told and believe that Word's new document structure is
less prone to corruption than earlier versions.
Microsoft Word 2010 Bible by Herb Tyson,
MVP. Nevertheless, a firm grasp of how Word works and the methods
shown here can be useful.
Word provides numerous options for formatting an outline numbered list.
There are a few additional things that law firms typically want to do that
are covered in this section.
CK NQTE: Page Numbering is not
covered here.
Centering Text Under the Number
A very common numbering scheme involves the first level of the
numbering scheme to be centered, with the text under it as shown in this
example:
Article I.
Introduction
If you try to set up a numbering scheme to do this, you will notice
that your number disappears when you press ENTER to type the text or the
text may seem off-center. The following exercise walks you through
centering text beneath a number.
Practice: Center Text Beneath a Number
- You should still have the document open from the last exercise.
- Position your cursor in the first paragraph (Article I.
Introduction)
- Choose Format > Bullets and Numbering.
- Select the Outline Numbered tab.
- Select the second box in the top row.
- Click Customize. In the Level box, Level 1 should be selected.
- Click More to expose the entire dialog box choices.
- Set the Number position to be Left.
 |
Warning Don't choose Center in this example,
as only the number and not the paragraph will be centered. This is
one of the reasons the heading looks
off-center. |
- Set Aligned At: to 0.
- Set Indent At: to 0.
- For Follow number with: choose Nothing.
- Click OK. Your text will look a little odd now with Article I and
Introduction not separated.
- Press the Center button on the Formatting toolbar to center the
text.
- Click in front of the word "Introduction" and press SHIFT+ENTER.
This will move the text to the next line without turning off or giving a
new paragraph number.
- Follow Steps 12 and 13 on the Article II paragraph.
- Keep the document open for the next exercise.
Styles with numbering would prevent you from having to center each
paragraph.
Add Formatting to Text without Affecting Paragraph Number
If you want numbered headings to be underlined, but do not want a line
under the number, it can be difficult if you don't know how it works. This
is because by default, the format of the number follows the format of the
text that follows it. For example, let's say you want to underline a
paragraph in a Heading 2 style. Chances are it will look like this:
1.1 Definitions
when you expected it to look like this:
1.1 Definitions
This formatting must be applied through the Customization dialog box of
Bullets & Numbering.
 |
Note In Word 2000, the underlining feature for
outline numbered lists is turned off by
default. |
Practice: Remove Underline from the Paragraph Number
- Select paragraph 1.1 Definitions.
- Apply underline formatting by clicking the Underline toolbar button.
Notice that the number also becomes formatted with the underline.
- Choose Format > Bullets and Numbering.
- Select the Outline Numbered tab, and then select the second option
on the top row of the gallery positions.
- Click Customize.
- Select Level 2.
- Click Font. When the Format Font dialog box displays, nothing is
available to be changed.
|
Note All of the controls in the dialog box are
either blank or grayed out because by default, the font formatting
of the number follows the font formatting of the text that comes
after-unless you explicitly declare exceptions as in the next
step. |
- From the Underline drop-down list, select None. There is a big
difference in leaving something blank and choosing None. Blank means
that it will follow the formatting of the text. None ensures that the
number will never be underlined regardless of text formatting.
- Click OK. The number is no longer underlined.
This formatting is changed on a level-by-level basis. You will need to
customize each level of numbering that you want to use.
 |
Tip Using the same logic for removing
underlining from a number, you can make the paragraph number bold
without having the text of the paragraph formatted as bold. Select
Format > Bullets and Numbering, and click Customize. Choose the
applicable level and click Font. Select Bold, and click OK twice to
close the dialog boxes. |
No Tab Option Setting
You may notice that when you are customizing an outline numbered list,
you do not have an option to set the value of the tab that follows the
number. You can only choose whether a tab, space, or nothing follows the
number.
|
Warning You can change the tab or remove it
individually in each paragraph. BUT, each time you make a
customization to your numbering scheme, the .25" tab will reappear
in all the paragraphs that are a part of the list. This behavior
occurs whether the numbering is tied to styles or
not. |
|
Note By default, Word follows the number with
a tab that is set at 0.25". If you set your Indent Position to be
larger than the Number Position, this will control the position of
the tab after the number as well as the text that follows it. But if
you want text to wrap back to the margin, the default 0.25" tab will
appear.
However, using Styles with Numbering can make this a little less
annoying. Once your document is complete, the last step should be
to fix the tab and update the style. It will at least prevent
you from having to change each paragraph
individually. |
Include Plain Text on Same Line As Heading
(And Only Have Heading Appear in the Table of Contents)
Word uses styles to create Tables of Contents. A common practice in law
firms is to generate outline numbered styles that have bold or underlined
heading text immediately followed by paragraph text on the same line.
Because the paragraph is formatted with a style, Word tries to place the
entire paragraph in the Table of Contents.
One solution is to format the heading with the style and follow it with
a hidden paragraph mark. You should format the text in the next paragraph
with a style that is not included in the Table of Contents. A hidden
paragraph mark keeps the text together on one line when it is printed,
even though it is actually two separate paragraphs. The Table of Contents
command picks up only those paragraphs with heading styles and places them
into the Table of Contents.
Later versions of Word (2002+) do this also with a Style Separator. Practice: Format Heading for TOC and Non-TOC Text on Same Line
- Create a new blank document.
- Type Agreement and press the SPACEBAR.
- Format the word Agreement with Heading Style 1 (you can press
ALT+CTRL+1).
- Press ENTER after the word agreement.
- Type This should not be included in the TOC. Make sure that
you are viewing non-printing characters by clicking the Show/Hide button
on the toolbar (the button with the paragraph symbol on it). You should
see paragraph marks next to the word Agreement if you are viewing these
characters.
- Select the paragraph mark that follows Agreement.
- Choose Format > Font. Check the Hidden option, and click OK.
- Hide non-printing characters by clicking the Show/Hide button on the
Standard toolbar. When the document is printed, it appears as though the
heading text for the TOC and the plain text are on the same line.
|
Tip You may want to change the color of the
Hidden Paragraph Mark to make it more visual to other users that
edit the document. |
Create Sequence Fields for Interrogatories and More
A Sequence field tracks differently numbered lists within a document.
Combining Sequence fields and AutoText entries give you a fast and easy
way to insert Interrogatories, Requests for Production, and Requests for
Admission.
Practice: Use Sequence Fields
- Type INTERROGATORY NO. followed by a space.
- Press CTRL+F9 to insert field characters.
- Type SEQ Rog within the field characters.
|
Note The "Rog" in this example is the name of
the Interrogatory numbering scheme. This name will keep this
numbering scheme unique from any other schemes that may be running
in the document. See Tip below for more
information. |
- Press F9 to update the field. A number "1" should appear.
- Select INTERROGATORY NO. 1, and press ALT+F3 to create a new
AutoText entry.
- Type rog for the AutoText entry name, and click OK.
- Type Request for Answer followed by a space.
- Press CTRL+F9 to insert field characters.
- Type SEQ Ans within the field characters.
- Select ANSWER 1, and press ALT+F3 to create a new AutoText entry.
- Type Ans for the AutoText entry name, and click OK.
- Type Ans and press F3. The next sequential number for an Answer
appears.
- Press ENTER and type rog and press F3. The next sequential
Interrogatory appears. To use the AutoText entry, simply type rog and
press F3.
|
Tip Follow the same steps (above) to create
Request for Production or Request for Admissions. The only
difference would be in Step 3, you would change the "rog" to "rpf"
or "rfa". This will keep unique numbering schemes running in the
same document. Therefore, you could have an Interrogatory No.1 as
well as Request for Production No.1. Keep in mind that if you cut,
copy or paste sequence codes, you'll need to select them and press
F9 to update the field codes. They do not update
automatically. |
CK NOTE: If this all still isn't
working, it isn't just you. Word's numbering is tough and doesn't work
well when heavily edited.
See Word's
Numbering Explained by John McGhie, MVP - comprehensive and not
pretty (Downloadable pdf
file in letter size) - Reading this is vital
to anyone attempting to use automatic numbering or bullets in a
setting where the documents are likely to be
reused or heavily edited. See also How
to Create a Template; this has a downloadable
template with style-based numbering.
The following are links to some discussions on the Microsoft newsgroups
on numbering. I recommend reading the article Word's Numbering Explained
before tackling these.
Back to Troubleshooting Table
of Contents
Troubleshooting Styles — Issues To Watch Out For
While styles are an integral part of using Word in a law firm or any
environment, there are a few things that cause users difficulty. This
doesn't mean that you should not create your own styles; you just need to
know how to solve some common problems and understand how you can avoid
them in the future.
A style has changed unexpectedly
Check to see if automatic updating is turned on for the style. With
automatic updating, a style is updated automatically when you make
additional changes to the style, meaning that every paragraph in your
document assigned to that style changes automatically. To turn off this
feature, choose Format > Style. In the Styles dialog box, select the
style, and then click Modify. If the Automatically update check box is
selected, clear it.
Your style may have been based on another style that has changed.
Changes to a base style affect other styles in the document that are based
on it. For example, if you change the font in Normal to the Arial font,
Word changes the font for the styles used in footnotes, headers, footers,
page numbers, and other text. If you don't want a certain style to change
when you change the base style, make certain your style is not based on
another style. Choose Format > Style. In the Styles box, click the
style you want to modify, click Modify, and then click (no style) in the
Based on box.
|
Warning When you base a style on No Style, you
will need to set the Language because the default will be No
Proofing.
Charles Kenyon note: I recommend
that you not base any styles on normal and that you change the
built-in styles so that they are not based on normal. This is
particularly true for any styles that are involved in paragraph
numbering. You may want to change the names of the built-in styles
as well so that your formatting will be maintained when moving from
document to document. (But, I have been told by someone whose
opinion I respect that my reluctance to use the normal style is
based on an urban myth.)
|
If you change the styles in a template and then reopen a document based
on that template, styles in the current document may be updated, based on
their new definitions in the template. If you don't want the styles in
documents based on a particular template to update when you open the
documents, click Tools > Templates and Add-Ins, and then clear the
check box next to Automatically update document styles.
If the template that contains the style definitions is missing or
damaged, styles in the current document use the style definitions from the
Normal template.
Applying a style turns off bold, italic, or underlining
Sometimes when you apply a style that has specific formatting
attributes to text already formatted this way, the reverse formatting may
occur. For example, when you apply a style that contains bold formatting
to a paragraph that contains some bold text, the bold text may lose its
bold formatting. This problem will not occur if you apply character
formatting— either through a character style or direct formatting — after
you apply a paragraph style. Apply the style first, and then select the
words to have other formatting and apply the formatting directly.
|
Tip To make sure that no direct formatting has
been applied to the text, first select the text completely and then
press CTRL+SPACEBAR. This removes manually applied formatting. Now
when a style is applied, there is no reversing situation to
occur. |
Paragraphs with the same style applied look different.
Often a style will be applied within a document, and then later
specific text in the document is selected and additional formatting is
applied without updating the style. This is called direct formatting.
While direct formatting may be your intention, if you share documents with
others, it can be confusing because text formatted differently can have
the same style name.
To remove direct formatting, select the paragraph, including the
paragraph mark, and then press CTRL+SPACEBAR to remove character
formatting and CTRL+Q to remove paragraph formatting.
Practice: Remove Direct Formatting & Return the Style to the
Original Definition
- Apply a style such as Heading 1 to text.
- Apply formatting such as Bold, Italic, and Underline to this text.
- In the same document, apply the same style to different text and
note that the text displays the same style name but appears with
different formatting.
- Select the Heading 1 text that has the directly applied character
formatting applied in step 2.
- Press CTRL+SPACEBAR to remove the directly applied character
formatting.
- Indent and center the text so that paragraph formatting is now
directly applied on top of the style.
- Press CTRL+Q to remove the directly applied paragraph formatting.
Both paragraphs should now look the same.
Back to Troubleshooting Table
of Contents
I see "Error, Bookmark not defined" instead of my page numbers in my
table of contents.
You need to update your table of contents by clicking within the table
and pressing F9 on your keyboard, and then selecting Update entire table.
Why do I see { TOC \o "1-3" } instead of my table of contents? (Or
alternately, { TOA \h \c 1 \p \f } instead of a table of
authorities.)
What you are seeing is the field code that Word uses to complete the
resulting table of contents or table of authorities. If you press ALT+F9,
you will toggle the field code back to the result of the code seeing the
expected table.
I deleted a footnote, but now my footnotes seem to be off by one.
When you delete a footnote, you must delete the reference mark from
within the document text. If you do not, even though the text and the
reference mark are gone from the footnote pane, Word will not delete the
footnote reference mark from the document. Highlight the reference mark
for the unwanted footnote, and delete it. Your references should now be
numbered correctly. Deleting the reference mark from the document also
deletes the footnote attached to it.
I tried to edit my footnote by deleting a paragraph mark and "Not a
valid action for footnotes" appeared.
You can format this paragraph mark, but it cannot be deleted.
I pasted a selection that contained a bookmark into a new document, I
tried using GoTo to find it, but it wasn't listed in my bookmarks.
Make sure the selection contains a space before the bookmark. Then when
you paste the selection into the new document, the bookmark will be there.
I edited a heading I had already cross-referenced, and I went to
update the cross-reference it didn't update.
You probably deleted the bookmark brace ([ or ]) that contained the
reference. When editing a heading that has been marked for
cross-reference, remember that the heading has been marked as a bookmark.
This is how Word knows where to find the reference in the document.
When editing a cross-referenced heading try this method: Click before
the last word in the heading, type in the new/additional text along with
the last word, and delete the next instance of that word. That way you
will not delete the bookmark brace. You can now update the
cross-reference.
Deleting a Page in Word
Why is this a problem?
In all versions
of Word (at least through Word 2019), Word does not really
see "pages" as a construct. It sees sentences, it sees paragraphs, and it sees
Sections. It does not see pages. Pages are created, on-the-fly in combination
with the current printer driver.
For example, if you insert a manual page break (Ctrl+Enter) at the end of a
paragraph you start on a new page, but Word sees the beginning text on the new
page and the text on the previous page immediately before the page break as
being in the same paragraph. So, if you apply the Heading 1 style to the text at
the beginning of your new page, the last paragraph on the previous page will
also be in Heading 1 style because, to Word, they are part of the same
paragraph.
This is not true if you insert a New-Page Section Break or if you apply
"page break before" paragraph formatting.
See
Moving/Reorganizing Pages In Microsoft Word
How to Delete a Page
Use the Mouse or Arrow keys to select text on the pages to be deleted.
Press Delete.
Note that a "blank page" may not really be blank and that you can have
problems deleting a blank page following a table. Both of these problems are
addressed in
Deleting "Blank" Pages by Suzanne Barnhill.
|
Word Count
|
CK WARNING: In all versions
of Word (at least through Word 2000) the Word Count shown in the document statistics in the
document's properties will exclude text in footnotes or
endnotes. This smaller number is also the figure generated
by the {NumWords} field.
This can cause problems with meeting court rules.
|
|
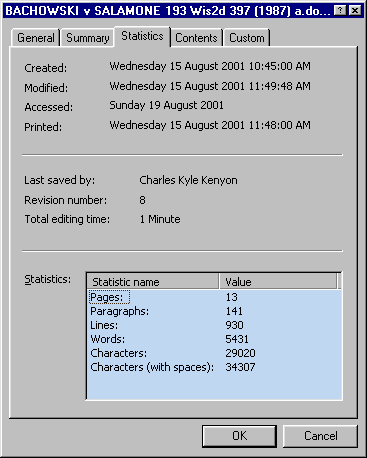
Document Statistics erroneously shows the total word
count for this document as 5,431 because endnotes and footnotes are
excluded from the count. If you have a certificate page showing
the word count, it probably uses a {NumWords} field
that gives the same (erroneous) number.
Therefore, if text in footnotes and endnotes is
supposed to be included in your word count it is vital to use Tools => Word Count to get an
accurate word count for the entire document by checking the option for
counting text in footnotes and endnotes.
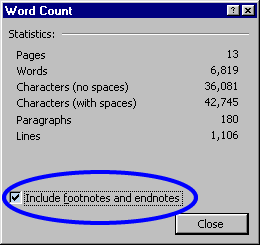
This method shows a count of 6,819 words for
the same document.
Selected Text Counts. Also, in Word 97 (2000)
the word count can not include text in footnotes or
endnotes referenced by selected text. The checkbox to include
footnote and endnote text is not enabled.
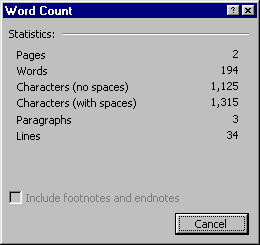
The word count excluding footnotes and endnotes is
194 words. For selected text counts, see KB Article Q239423.
There is a macro work-around to get a count on selected text that
includes footnotes and endnotes available in KB Article Q241316.
That macro will give you the following display:
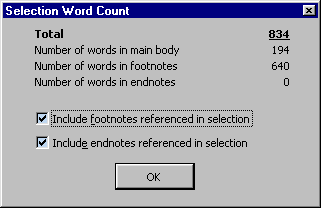
Using the macro solution, the count for the same
selection of text is 834 words, 194 in the body and 640 in
footnotes.
|
Back to Troubleshooting Table
of Contents
Troubleshooting Sections, Headers and Footers
Why is the spacing off in the footer of a landscape page?
- Check first to see if there are section breaks setting off the
landscape page.
- Even though the footer will look the "same as previous," that option
must be turned off.
- After turning it off, move the center tab to 5.5 inches and the
right tab to 10 inches.
- Continue to the following section and, again, turn off "same as
previous."
The page number was formatted to show A, B, C. It's not appearing in
the footer.
Although the number was formatted correctly, it was not inserted. First
format the number to get what is needed; then insert the number in the
footer.
I can't see the headers and footers.
If you are in Normal View, it is necessary to click View > Header
and Footer. If you switch to Page Layout View (Word 97) or Print Layout
View (Word 2000) you will see them as grayed out text. Double click in the
header or footer and the Header/Footer toolbar will be accessible.
The section break doesn't allow me to have both portrait and landscape
text on the same page.
Unfortunately, Word will not allow this by the use of a section break.
To achieve the desired effect, you must insert a text box.
CK Note: See
How to set up a document with front matter numbered separately by
Suzanne Barnhill. See also:
Header/Footer Settings Recap - Ribbon Versions or
Header/Footer Settings Recap - Menu Versions
Back to Troubleshooting Table
of Contents
Troubleshooting Tables
How can I make a pleading caption in Word?
There are a couple of different methods you can use to create a
pleading caption in Word, but tables are one of the best ways to do this.
Practice: Make a "Scalloped" Caption Using Tables
- Perform steps 1 through 5 in the "Insert a Table with Draw Table
tool" in the preceding exercise.
- At this point the bottom left border needs fixing. Click in the
left-most cell, and choose Format > Borders and Shading. Click the
diagram on the right side of the dialog box to have only a bottom
border. Click OK.
If you have a lengthy caption (you've probably seen some that go on for
pages), you may have noticed that the scallops don't automatically copy
down the center column of the table. If you don't find this acceptable,
consider another way to make a caption where you use a border line
separating the parties from the pleading title. Many courts now accept
captions prepared this way—check your court rules to see if you can use
this type of caption.
Practice: Make a "Bordered" Caption Using Tables
- In a blank document, create a table with two columns and only one
row.
- Remove the printing borders by clicking inside the table, and then
pressing ALT+CTRL+U.
- Fix the bottom left border as described in step 2 in the "Make a
"Scalloped" Caption Using Tables" example that preceded this exercise.
While you're in the Borders and Shading dialog, turn on the printing
border for the right side of the left-most cell as well.
In this type of caption, the border automatically extends as you add
cross-complainants or type a long pleading title.
How can I get the first row to repeat at the top of each page
throughout the table?
In lengthy tables such as file or pleading indices, holdings lists, and
other legal documents, if a table spills onto subsequent pages you can
make headings repeat at the top of each new page that contains a part of
the table.
Practice: Create Table Headings
- In a blank document, choose Table > Insert Table (Table >
Insert > Table in Word 2000).
- Create a table with two columns and 250 rows.
- In the first cell of the first column, type Attorney.
- In the second cell of the first column, type Extension.
- Select the first row of your table, and then choose Table >
Headings (it's called Heading Rows Repeat in Word 2000).
- Go to Print Preview and view your handiwork.
Word also allows you to have more than one row repeat at the top of the
page. Just select the rows that you want to repeat and perform step 5
above. Continued Note in Heading Lines (CK
Note)
How to have the word "continued" in the headings of multipage tables on
continuation pages.
There is no automatic way to do this. Several Word
MVPs have posted the following solution,
though, and it works.
Put the word "continued" in the heading line on the first page. Then
create a textbox or autoshape anchored outside the heading row and
use it to cover the word. The shape or text box should have no border and
white fill. This way, the word continued will not appear on the first page
but will appear when the row (without the textbox or shape) is repeated on
subsquent pages.
When I have a lengthy entry in one of my cells, the text can break
over a page. Is there a way to turn on the equivalent of "Block Protect"
or "Keep Lines Together" in Word?
It's possible to have it either way in Word—you can have your cells
break over a page or not, depending on your preferences for the job at
hand. By default, the text in a table breaks across a soft page break in
both Word 97 and Word 2000. Let's explore the options in the following
exercise.
Practice: Prevent Cells from Breaking Over Soft Page Break
- In a blank document, choose Table > Insert Table (select Table
> Insert > Table in Word 2000).
- Create a table with 2 columns and 250 rows.
- Make sure you're in Page Layout view (Print Layout view in Word
2000).
- Go to the bottom of the first page and type in one of the cells
until you see text both above and below the Soft Page Break.
- Make sure your cursor is anywhere in the table, and then choose
Table > Cell Height and Width (Table > Table Properties in Word
2000).
- In the Cell Height and Width dialog box, find the check box Allow
row to break across pages. If the option is checked, the text can break
over a page. If not, the row that contains the cell that broke over a
page is moved to the next page in its entirety.
This does not prevent cells from breaking over hard page breaks. Also,
if you have more than a page of text in a cell, a soft page break must
exist somewhere in that text, and the text breaks over a page even though
you've cleared the checkbox in step 6.
Is there an easy way to make a file index in Word? I had a macro in
WordPerfect and now I've got to make them from scratch.
The bad news is that you do have to make it all over again; the good
news is that you'll only have to create it once. Using the power of tables
together with AutoText, you'll be able to make a killer file index that
you can use repeatedly.
Practice: Create a File Index Using Tables
- Open a blank document, and choose Table > Insert Table (select
Table > Insert > Table in Word 2000).
- Create a table with as many columns as you need (we'll use 4 in this
example) and 2 rows.
- In the first cell of the first column, type Number.
- In the first cell of the second column, type Document Name.
- In the first cell of the third column, type Date Filed.
- In the first cell of the fourth column type Description.
- Click in the second cell of the first column, and then turn on
numbering (On the Formatting toolbar, click the Numbering button). This
will give you a numbered column down the left side.
As you add rows to your table, the numbered list on the left side
increments. Try it! If you save your finished product from the exercise
above as an AutoText entry, you can retrieve it as many times as you like
in the future.
My table column resizes as I type…
Table columns in Microsoft Word 2000 automatically resize to fit text
or graphics. If you type a word that is longer than the width of the
column, the column adjusts to accommodate the text. If you don't want your
columns to resize when you type, click in the table, click Table >
Table Properties > Table. Click Options, and then clear the check box
next to Automatically resize to fit contents.
I am doing very simple math in my Word table. Is it possible to create
subtotals?
It's possible to take any value in just about any part of a Word
document (it doesn't have to be in a table) and run it through any number
of math functions against other values in other parts of a Word document.
The way to do it is to use bookmarks. An example of how this works is
shown in the next Practice exercise.
Practice: Work with Subtotals in a Word Document
- In a blank document, create three separate tables with values in the
first two cells of the first two tables.
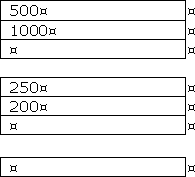
- We're going to derive subtotals for the two tables and then a grand
total of the two subtotals in the single-cell table at the bottom. Click
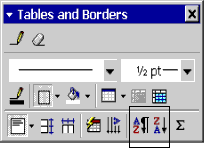
in the third cell of each of the first two tables and click the AutoSum
button at the far right side of the Tables and Borders toolbar.
- Select the first sum field (it should say "1500" if you've used the
example above), making sure not to select the end-of-cell marker after
it (it kind of looks like a spider).
- After selecting the first sum field in step 3, choose Insert >
Bookmark. For keyboard users, CTRL+SHIFT+F5 gets you to the Bookmark
dialog box.
- Give the selection a bookmark name like "Table1Total".
- Repeat steps 3-5 for the second total ("450" if you're following the
example above), calling it "Table2Total".
|
Note Names of bookmarks in Word cannot begin
with a digit, nor can they have a space in their
name. |
- Having bookmarked your totals, click in the single-cell table at the
bottom. Choose Table > Formula.
- In the top box labeled "Formula" you'll see an equal sign. Type the
word "SUM", then an open parenthesis "(" and choose "Table1Total" from
the Paste Bookmark drop-down list.
- Type a comma after "Table1Total" then go to the Paste Bookmark
drop-down list and choose "Table2Total".
- Type a close parenthesis after "Table2Total" in the Formula box.
Your formula should look like this:
=SUM(Table1Total,Table2Total)
- Click OK. Confirm your total is the same as what you expect it to be
(in this example, "1950").
If you get a result which says "!Syntax Error,", try the exercise
again, making sure that you don't select the end-of-cell marker after the
number when book marking.
I never could understand sorting in Word tables. Is it possible to
sort dates and numbers as well as text?
It's easy to sort dates, numbers and text in a Word table. If a simple,
one-level sort is all you're after, you'll be surprised at how easy it is.
All you have to do is click in a column that has a list of things you'd
like to sort (like filing dates, for example) and click one of the two
sort buttons near the right side of the Tables and Borders toolbar. The
practice exercise below should give you an idea.
Practice: Sorting Dates in Tables
- In a table, enter an array of dates that are near each other but
have varying formats, like the following:

- Click anywhere in the column and click either one of the sort
buttons at the right side of the Tables and Borders toolbar. One button
sorts in Ascending order, the other in Descending order.
Word automatically converts dates in many different formats behind the
scenes so it can sort them correctly.
|
Note When you use either of the Sorting
buttons on the Tables and Borders toolbar, Word assumes you have a
header row. If you don't, you have to sort by choosing Table >
Sort. |
Part of the text is hidden inside a table cell…
You've probably set an exact row height that's smaller than the text
you are trying to display. Click in the cell and then click Table >
Table Properties > Row. In the Row height is: box, select At least.
Can I insert an Excel worksheet into Word?
Microsoft Office is so popular in good part because of how the programs
work together. Excel is a spreadsheet program that makes number crunching,
organizing and presenting data very easy — even for the
mathematically challenged.
To insert an Excel worksheet into a Word document, click the Insert
Microsoft Excel Worksheet toolbar button on the Standard toolbar. Select
how many rows and columns to be created and release the mouse. Once the
Excel spreadsheet appears in your Word document, you can double-click to
activate the Excel worksheet and gain the toolbars and menu options
available in Excel. Now you have the full functionality of Excel without
leaving the Word window.
|
Note If the data already exists in an Excel
spreadsheet, open the spreadsheet, select and copy the text, switch
to Word, and choose paste the copied text. Word converts the data
into a table format. |
|
Back to Troubleshooting Table
of Contents
[ Home ] [ Introduction ] [ Web Resources ] [ Word Books ] [ Confidentiality ] [ Word FAQ ] [ Downloads ] [ Word 2002 ]
(this
guide table of contents) ----- (MS
Word New Users FAQ)
Search Usersguide to Microsoft Word using Google
This chapter from original Legal Users Guide to Microsoft Word 2002 -
document in zip format
 page views since 13 April 2004 page views since 13 April 2004
 Copyright 2000, Microsoft Corporation. Copyright 2000, Microsoft Corporation.
Copyright 2000-2002, 2004-2006, 2010-2026
Charles
Kyle Kenyon
See information about copy permission.
Search Intermediate Users Guide to Microsoft Word Using Google My office page as a
Madison,
Wisconsin Criminal Defense Lawyer.
Original Legal Users Guide to Microsoft Word 2002 - Documents in Zip Format
A note about link exchanges. This site does not participate in
link exchanges to build web presence. If you have a link that you think would be
of use to people reading this page, please send it to the webmaster with the url
of the page where you think it should appear and it will be considered. Your
placing a link to this site will not affect the decision on whether to add your
link, though.
|
