|
| |
Using the StyleRef { Field } in Microsoft Word
by Charles Kyle Kenyon, Esq.
Last updated
Tuesday, January 03, 2023.
What You Will Learn
After completing this lesson, you will be able to:
Other Chapters Related to Topics Covered in this Lesson
Additional Written (and Web) Resources
 |
Word Help topics:
 |
Dictionary-style headers |
 |
Fields |
|
 
(this
guide table of contents) ------- (MS
Word New Users FAQ)
|
"A
field in a Word document is simply a placeholder that contains
the instructions for what should go here rather than the text
itself."
John McGhie
"Word's
Numbering Explained"
|
Overview
This is an expanded excerpt from the
Chapter on Word Fields. You will find fields to be one of your basic tools in preparing
document templates that will automatically update themselves to reflect
information you want to be in the document.
The StyleRef field is used to get information from text formatted in
a certain style (paragraph or character). That can be a repeat of the
text formatted in the style or the location or the number for numbered
paragraphs. In most cases, it is used in the headers and footers of a
document but it can be used in the body as well.
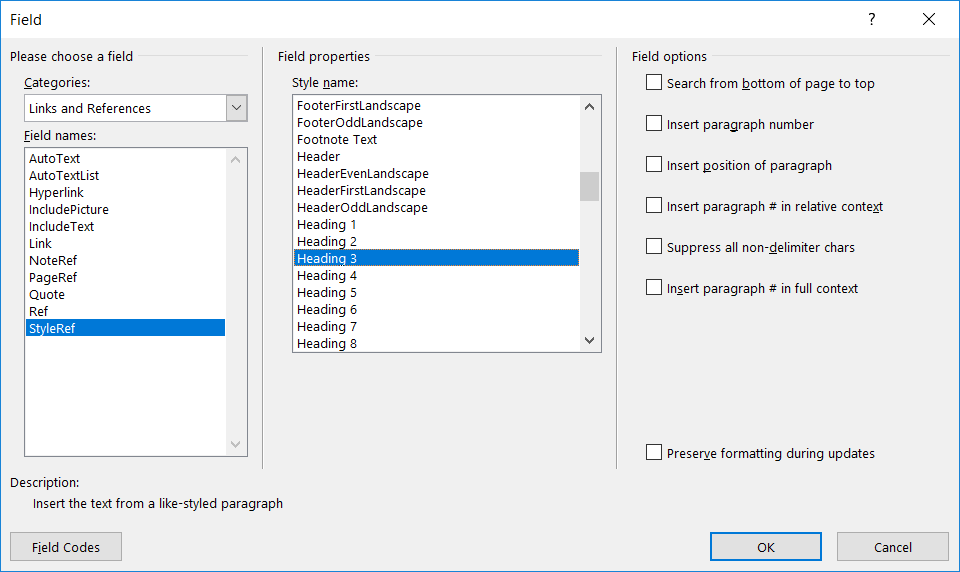
- Insert => (Quick Parts =>) Field... => Links and References
(left window) => STYLEREF (bottom of right window)
- Pick or type the style name (right or center window)
- Choose options or leave blank (If blank, you get the text
formatted in the style)
- Search from bottom of page to top (\l switch)
- Insert paragraph number (without text - \n switch) Causes
the field to display the entire paragraph number for a
referenced paragraph without trailing periods. No information
about prior levels is displayed unless it is included as part of
the current level.
- Insert postition of paragraph (above/below - without text
-\p) This is of little use in headers and footers.
- Insert paragraph number in relative context (without text -
\r switch) Inserts the entire paragraph number of the bookmarked
paragraph in relative context — or relative to the paragraph
numbering scheme — without trailing periods.
- Suppress all non-delimiter characters (used with displaying
numbers - \t switch) When used with the \n, \r, or \w switch,
causes the StyleRef field to suppress nondelimiter, or
nonnumerical, text. With this switch, for example, you can
reference "Section 1.01," and only "1.01" is displayed in the
result.
- Insert paragraph number in full context (\w switch) Used
with one of the other numbering switches. Inserts the paragraph
number of the bookmarked paragraph in full context, from
anywhere in the document. For example, when referencing
paragraph "ii.," a StyleRef field with the \w switch would
return "1.a.ii" as a result.
Using the STYLEREF Field and Styles in the header/footer instead of
multiple sections with different Headers / Footers
Do you want your headers or footers to reflect the content of
the page, or change from Chapter to Chapter?
You can use the StyleRef field with Word's built-in Heading
Styles to change the content of the Header / Footer to reflect local
document contents. Thus the Header/Footer can change to reflect
headings and other content.
Using the STYLEREF Field to create
dictionary-style headers/footers
Are you trying to get dictionary style fields (Krofta - Lamb) listing
the
first and last entry on your page?
If that is what you are trying for, the following will work:
Put your last name field (or whatever it is you are trying to capture)
in a particular character style in your primary
merge document.
The character style does not need to look any different from surrounding
text but it can look different.
In the header/footer use
two STYLEREF fields with an optional switch on the last one to tell it
to search from the bottom of the page instead of the top. STYLEREF
fields probably don't show up in the mailmerge toolbar.
Insert => (Quick Parts =>) Field... => Links and References (left window) => STYLEREF
(bottom of right window) => Options (button)
Look in help for "dictionary-style headers."
You can name the character style anything you want and it should be
based on your default character font with no changes. You are using the
style as a tag rather than as a way of formatting. Remember, this new
style is a character style rather than a paragraph style.
This is especially useful when you have something on the first page
of a document which, if changed, should be reflected in continuation
page headers or footers. Examples: the addressee name, the subject, the
date.
Useful StyleRef Field Tricks - Suzanne S. Barnhill, MVP
If you are doing this in a mail-merge, you may have to insert the header
after you do the merge. Try inserting it before you do the merge, if
that doesn't work, then try after. (I haven't tried this with a mail
merge but it should work. After you get results, please share them by
letting me know so I can update this.
Using the STYLEREF Field and
Styles instead
of Bookmarks and REF fields
Do you want something entered in one place in your document
reflected elsewhere?
{ StyleRef "MyStyle" } instead of { Ref "MyBookmark" }
If your have a single word or a phrase in a document marked in
the character style "MyStyle" that word or phrase will be reflected
in this field's results, instantly. This updates in headers and
footers as well as in the body when the marked text is changed. It
is much more robust than bookmarks which are easily deleted by
accident. See
Letterhead
Textboxes and Styles Tutorial - two page download demonstrating StyleRef
and Author fields, among other things.
Either a character style or a paragraph style will work with the
StyleRef field. The style does not have to change any formatting -
it can just serve as a marker for the field. In the tutorial the
styles used do have formatting functions as well -- primarily the
paragraph spacing and the designation of the following style.
Note: it has been observed that if there is a bookmark with
the same name as the reference style it can cause problems. See this
forum thread.
Making a StyleRef field only appear if there is text in the
style - getting rid of the Error message!
If you use a StyleRef field and there is no text in that style
anywhere in the document, you will get an error message. That
probably is not what you want. You can use a
conditional (IF) field to screen the error message.
The following nested field displays nothing unless there is
something in the named style. If something is present in that style,
it gives you the text set in the style as well as extra comment text
in the field.
{ IF {STYLEREF "stylename"}
<> "Error!*" "{STYLEREF "stylename" } extra comment
text" }
If you do not need the extra comment text, do not put it in the
field.
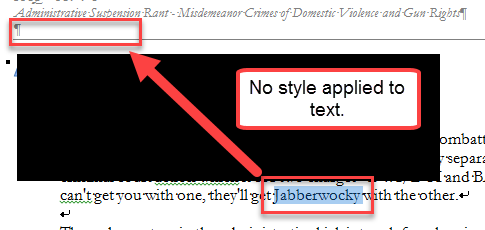
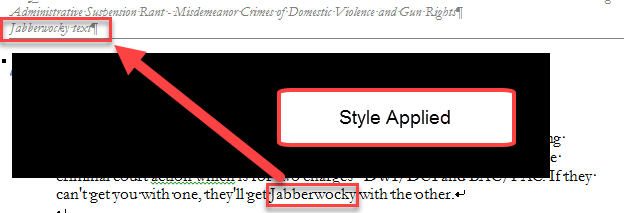
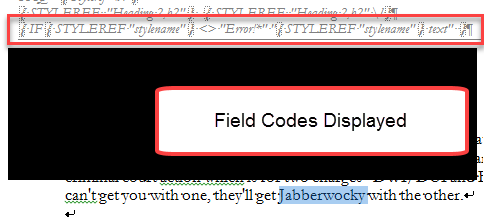
This coding came from responses to a
Word Answers forum question.
Thank you to Paul Edstein, Doug Robbins, and
Suzanne Barnhill for this field coding!
Note, if the StyleRef field
finds text that has been formatted as hidden, it will display blank.
It will not search for the next displayed text.
The { } field delimiters can not be typed
using the braces characters on the keyboard. They are special Word
characters that have to be inserted as a pair using
Ctrl+F9,
or Insert => Field... or Insert => Cross Reference... or some
other special field insertion command. If you are using Ctrl+F9 you
can either press Ctrl+F9 first and then type your field or type the
field code first, select it, and press Ctrl+F9. Once you are done with
the field, press F9 to update the field and display the result.
I call these delimiters { } "braces" in this and other
pages. Microsoft calls them brackets, but to me brackets have right
angles and look like [ ] so I'll go on calling delimiters
braces.
Some computers have hijacked the Function keys in their BIOS.
These computers should have a Fn shift key on their
keyboards. So, instead of Ctrl+F9, you would press
Fn+Ctrl+F9 (or edit the BIOS so that function keys act as
described in documentation for programs).
How to toggle the Display of Field Codes in
Word
Sometimes (rarely) you want to see the field codes rather than the
text generated by a field. This can be set in your Word Options, but
the simple way is to use the keyboard shortcut of Alt+F9. This
switches all fields in the Word session to display or hide field
codes. Note, this is a Word option toggle and remains set for all
Word documents and future Word sessions until toggled back.
When you have field codes displayed in a document, they will
print rather than the field code results. This is great for
debugging, but not what you usually want. You can also choose to
print them as a print option.
The XE (Index Entry), TC (Table of Contents Entry) and
TA (Table
of Authorities Entry) fields are exceptions. Those fields are
displayed when Hidden text is displayed and are not affected
one way or the other by the toggling of Field Code Display.
Complex Documents - Microsoft Word
Intermediate User's Guide - Table of Contents - Table of Authorities
- Cross-References
How to copy a field from a newsgroup or email message into Word:
If you are using a typed field display from a newsgroup
or email message first make sure that the field isn't broken up by any
line breaks or paragraph breaks. (Lines that are wrapped automatically
by Word are fine but turn on Show All to make sure there are no
special characters at the end of the line.) Select the text inside a
matched pair of braces and press Ctrl+F9. Word will insert its field
delimiters around the text. Delete the typed braces.
For instance, with the field:
{ = { REF "Number1" } * { REF "Number2"
} }
first select
REF "Number1"
and press Ctrl+F9, then select
REF "Number2"
and press Ctrl+F9, then delete all of the typed braces and select
everything from the = sign to the end of the second field and press
Ctrl+F9 again.
Then press F9 to update the field and display the result.
If you press Alt+F9 (view field codes) you'll see something that
looks very much like what you started with except the field delimiters
look like bold braces and the field will probably be shaded. Press
Alt+F9 again to go back to viewing the field result.
You can also use the
macro found on Graham Mayor's site to convert fields to/from
plain text.
For more on fields, follow the links on the Word
Web Resources Page. For a table of shortcut keys dealing with
fields, see below.
Using the Insert Field... dialog box to insert fields
The Insert Field Dialog box is virtually unchanged since Word 97. You
get to it in Word 97-2003 using Insert > Field, and in Word 2007 and
later using Insert (tab) > Quick Parts > Field.
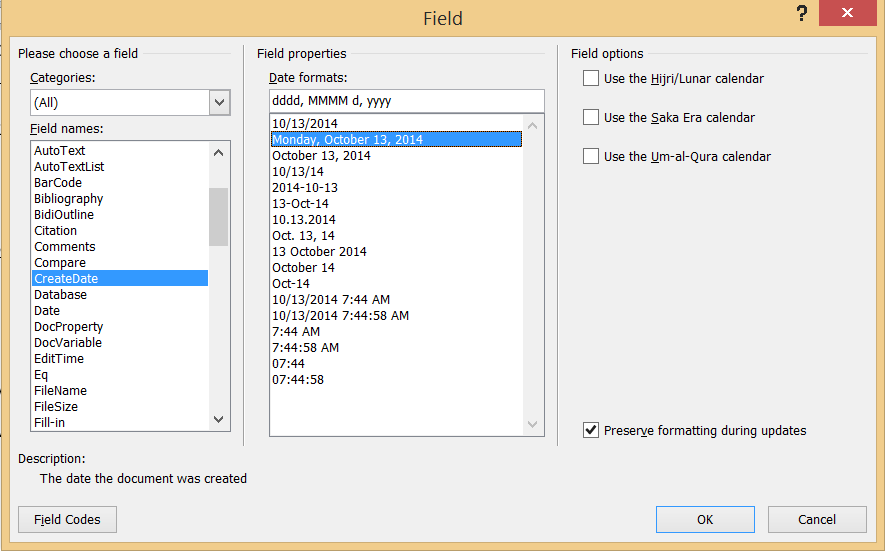
Insert Field dialog (CreateDate)
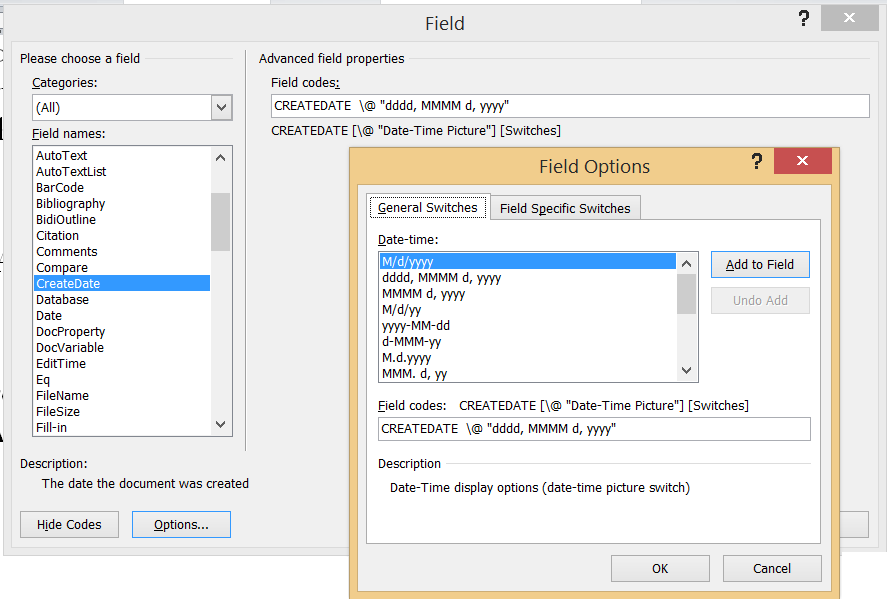
Insert Field Dialog (Field Codes > Field Options)
The screenshots above are for the Insert Field dialog box using the
CreateDate field. The first shows the dialog box as it first appears.
The second shows what you see after you click on the Field Codes button
(bottom left) and then on the Options button.
There is no corresponding Chapter on the Microsoft website.
 page views since 14 April 2004
 |
|
|
page views since 14 April 2004


