About this page
From Shauna Kelly's page Why Use Microsoft Word's Built-In Heading Styles? at https://www.shaunakelly.com/word/numbering/usebuiltinheadingstyles.html
This updates section 14 which referred to the Document Map in the original and now refers to the Navigation Pane. New sections 17&18 are added at the end to refer to expanding and collapsing text areas using Heading Styles and about Keep With Next formatting..
Why use Word's built-in heading styles?
You can do many document organization tasks using your own custom styles.
But there are over a dozen good reasons to use the built-in Heading styles and modify them to suit your needs.
Word has nine built-in Heading styles. They are called Heading 1, Heading 2 etc. You can use other styles (including your own custom styles) for most heading and numbering purposes. But there are good reasons to use Word's built-in Heading styles.
If you don't like the format of the built-in styles (and few people would find them attractive as they arrive out of the box), you can modify the styles so they have the font, paragraph and other formatting you want.
1. Numbering
You can apply numbering to any kind of style. But Word makes it easier to apply numbering to the built-in Heading styles. See How to create numbered headings or outline numbering in Ribbon Versions of Word by Shauna Kelly
2. Applying the styles using Keyboard Shortcuts
It is particularly easy to apply the built-in Heading styles because Word has built-in keyboard shortcuts. See How to apply a style in Word for a list. These can be expanded: Heading Style Keyboard Shortcuts Add-In for Headings 4-9
3. Table of Contents
You can use any styles to construct a Table of Contents. But Word makes it easier if you use the built-in Heading styles, because they are the default.
4. Page numbering with "chapter" numbering
Let's say you want your page numbers to look like Page 1-4 or Page 2.5. There are several ways to achieve this. But the numbers won't appear properly in your Table of Contents unless you use Word's built-in heading styles.
See I want to include the chapter number with the page number in the Header – how can I do this? on the MS Word MVP FAQ site for a description of how to do page numbering like this (and several good reasons why you might not want to!).
See How to control the page numbering in a Word document at the MS Word MVP FAQ site for a description of how to control page numbering in both simple and quite complex ways.
5. Captions with "chapter" numbering
There are several ways to create captions for your figures or tables so they look like "Figure 1-4" or "Table 2.3". But it's a lot easier to use Word's built-in caption functionality.
In Word 2000, it's at Insert > Caption.
In Word 2002 and Word 2003, it's at Insert > Reference > Caption.
In Word 2007 and later versions, it's at References > Insert Caption.
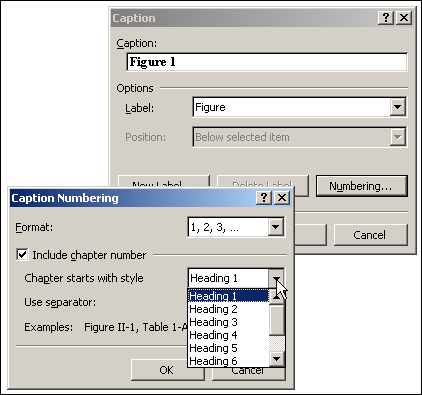
In the Caption dialog, you add the chapter number by clicking Number and choosing which style to use for the "chapter" number. But it only works with Word's built-in Heading styles (Figure 1).
Figure 1: When you go to add "chapter" numbering to captions, the only available styles are the built-in heading styles.
6. Referring to the captions
If you want to refer to captions in your document (for example "see Figure 1-4, on page 12, above"), then the label (in this case "Figure") must appear in the Insert Cross-reference dialog. The only labels listed there are those either built-in or created in the Insert Caption dialog. So even though you can create your caption numbers without using Word's caption functionality, you can't refer to the captions without the built-in caption functionality (unless you create a complex system of bookmarks).
So if you want chapter numbering in your captions, you may as well use the built-in Headings styles and the built-in caption functionality to start with.
7. Stability of list numbering
You can create a custom style and number it using the techniques given in How to create numbered headings in your Word document.
But if you accidentally or deliberately delete a custom style that was part of an outline numbering scheme, the whole numbering scheme can collapse. That means you have to go back and re-create the numbering from scratch. Word won't let you delete the in-built Heading styles, so it helps to protect you and keep the document stable. (If you try to delete a built-in Heading style, Word just re-sets it to the default. But at least it's still there!)
8. Publishing to the web
The standard language for publishing documents on the web is HTML. A basic element of HTML is to label headings as H1, H2 etc. If you save a Word document as an HTML file to be published on the web, Word automatically and correctly translates text formatted with the built-in Heading styles as H1, H2 etc.
9. International Issues
Word comes in dozens of language versions. But "Heading 1" isn't "Heading 1" in Finnish or French or Farsi. It's easier to transport Word files (and especially those involving Tables of Contents or macros) across different language setups using the built-in Heading styles, because Word uses special codes to refer to them that are independent of the language being used.
For example, if you create an ordinary Table of Contents that shows 3 levels of built-in heading styles, Word creates the Table of Contents using a field code like this: { TOC \o "1-3" }. The "1-3" refers to styles "Heading 1" to "Heading 3", but it is independent of the language version being used. You can't get that if you use custom styles.
If you're creating documents for an international audience that include STYLEREF fields, you can use shortcuts to refer to the built-in heading styles that are independent of your language version of Word. Use { STYLEREF 1 } instead of { STYLEREF "Heading 1" }.
If you're writing VBA macros for people using Word in several different language versions you might like to look at the list of built-in style constants in Word. You can use the style constants across language versions. For a list of style constants including a macro that lets you add local style names, see Macro – Create List of Local Built-in Style Names.
10. Creating PDF files
Adobe Acrobat knows about Word's built-in heading styles. Creating bookmarks in a PDF file is easiest if you use Word's built-in heading styles. Bookmarks are the clickable menu items on the left of many Acrobat files that you can expand and collapse headings to show different levels. And in Word 2007 and Word 2010, when you choose to save a document as a PDF file, you can tell Word to turn the built-in headings into PDF bookmarks (to do that, click the "Options" button in the Publish as PDF or XPS dialog).
11. Creating Hyperlinks within your document
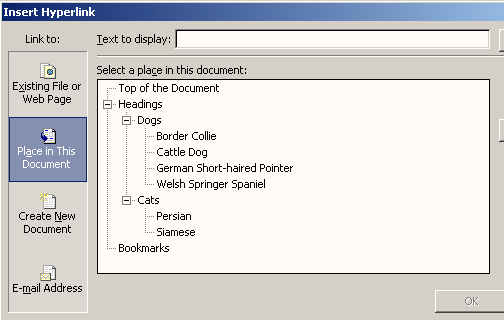
Figure 2: The Insert Hyperlink dialog box. Note that there are no options for creating hyperlinks to custom styles. The only options are to link to built-in Heading styles or individual bookmarks.
Word makes it very easy to create hyperlinks to text formatted with the built-in heading styles. Use Insert > Hyperlink (Figure 2).
If you use custom styles, your only option is to bookmark every heading individually and pray to the God of your choice that you edit your heading text very carefully around the bookmarks.
12. Using SEQ fields
If you use SEQ fields for numbering captions or other lists, you can use a switch in the SEQ field to tell Word to re-start the numbering after each occurrence of a built-in Heading style. For example, you might tell the SEQ field to restart after each paragraph in Heading 1 style. There is no equivalent switch for custom styles. (Word's Help lists all the switches for the SEQ field. Just look up "SEQ".)
13. Navigation Pane / Document Map
The Navigation Pane (View > Navigation Pane) gives you an instant, clickable multi-level table of contents in your document.
In Word 2007 and earlier versions, the Document Map (predecessor to the Navigation Pane) produces very peculiar results unless Word can easily see the structure of your document. And the number one way that Word looks for structure in your document is looking for use of the built-in heading styles.
For Word 2010, Microsoft changed the behaviour so you won't see peculiar results. (But, in Word 2010, the Navigation Pane is even more important than ever before. So it's even more important to use the built-in heading styles.)
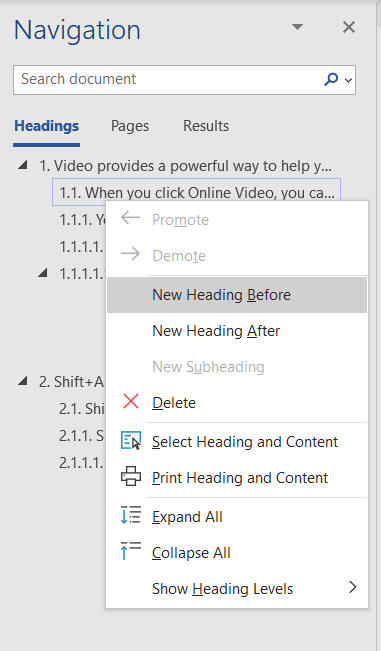
The built-in heading styles will appear in the Navigaton Pane automatically. You can assign an outline level to a paragraph in some other style or make that level part of the custom style and it will appear in the Navigation Pane. However, you will not be able to promote or demote any styles other than the built-in heading styles (and styles based on those styles). Here you can see that the promote/demote commands are not available for custom styles even though they appear in the Navigation Pane.
By the way, in Word 2003 and earlier versions, you can modify the font and shading used in the Document Map. Simply modify the built-in style called "Document Map".
Read about How the Document Map works in Microsoft Word on Shauna Kelly's site.
You can add a style to the Navigation Pane by assigning an Outline Level to it, but unless you have a reason to not use the built-in styles, why bother?
14. Accessibility
Screen readers used by people with vision impairment rely on the built-in heading styles to make sense of documents. A screen reader doesn't know what to make of your custom style and, worse, can't recognize that direct formatting (eg bold, a large font size) identifies a heading. To make accessible documents, use Word's built-in Heading styles.
Furthermore, using the built-in heading styles enables you, or readers of your document, to use the Navigation Pane effectively (as described above). The Navigation Pane is used by people with limited mobility to navigate documents.
Recent versions of Word have an Accessibility Checker and that depends on your use of the Built-in Heading Styles. Remember, you can change the appearance of these styles.
15. Cross-references
Word can create cross-references to your headings (eg "see Panama, below"). If you want un-numbered headings, and you use the built-in heading styles, then you can create cross-references with ease. If you want un-numbered headings and you don't use the built-in styles, then the only way to create the cross-references is to create a bookmark for each individual heading, and pray to the god of your choice that you don't accidentally type within the bookmarks as you edit your document.
16. Outline View
Maybe the best reasons for using Word's built-in Heading styles were kept till the last.
You can use other styles in Outline View, and you can choose the Level at which they'll appear. But it's easiest to use the built-in Heading styles, because they're already set up ready for you.
Outline View is probably the most useful, and least used, resource in Word. See How to save yourself hours by using Outline View properly at the MS Word MVP FAQ site for a full (and enthusiastic) description of what Outline View can do, and how to use it.
In Word 2013 and later, you can collapse and expand parts of your document between headings in print view (and printed copy).
17. Collapse and Expand Text Under Headings (Word 2013 and later)
Word has added collapsible/expandable text in print view beginning with Word 2013. You can collapse all text between a heading level and the next heading of that level. This appears on screen and in printed versions.
If your users have Word 2013 or later you can have text following heading styles collapse and expand. Your users would have to know how to do this. You could have the beginning of your document explain this feature.
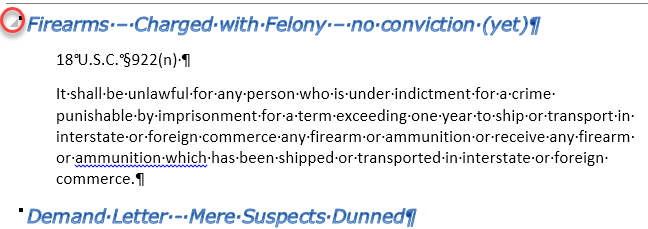
Everything between the heading and the next heading of the same level (or higher level) is concealed. That is, if your heading is outline level 3, everything between that heading and the next text formatted as level 3 (or level 1 or 2) will be collapsed or concealed. Here is text that has been collapsed. Note the left-facing triangle in the violet circle. That triangle will show up on screen next to any collapsed heading, but will not print.

Figure 3: Headings Collapsed; showing right-facing triangle indicating presence of more text between.
Here is the same section, expanded. The triangle has become grey and has turned clockwise. The triangle that allows you to collapse the text only shows when the mouse hovers over the beginning of the heading and does not print.

Figure 4: Headings not collapsed
Note, you can use this feature with custom styles as well, so long as they have an outline level set as part of the paragraph formatting.
18. Keep with next is built into the formatting
Perhaps this should be the first point. You want your heading to keep with at least the first paragraph of text that follows it. This is paragraph formatting built into all of the built-in heading styles.
Conversely, if you apply heading styles to everything in your document, your pagination will seem random because you are telling Word that you want everything on one page. (Hint: If you have more than one page of material, Word can't do that!) See Improving the Bottom Line by Suzanne Barnhill, MVP if this seems to be happening to you.
The 11th item in this list was prompted by Mike Bishop of the UK who reminded me about this reason for using the built-in Heading styles.
The 14th item in this list was prompted by Microsoft Powerpoint MVP Glenna Shaw. I keep finding reasons to use Word's built-in heading styles. At the MVP Summit in Seattle in 2004, Glenna Shaw reminded me that using the built-in heading styles provides for more accessible documents.
The 15th item in this list was suggested by Microsoft Word MVP Suzanne Barnhill following a discussion in Microsoft's newsgroups "My styles are all messed up".
Topic: Numbering, headings, outlines
Version: Word 2000 Word 2002 Word 2003 Word 2007 Word 2010
Created August 2002. Last updated 19 September 2017.
-------------------------------------------------------------------------------------------------------------------------------------
This article is copyrighted. You may, however, print any page on this site for your own use or to distribute to others, as long as you give it to others in its entirety, with no changes.
The creator of ShaunaKelly.com, Shauna Kelly, passed away peacefully on Wednesday November 16, 2011 after a long battle with ovarian cancer. If you are requesting permission to re-use any information on this site, then you may do so with appropriate acknowledgement of her work. If her words, thoughts or pictures have helped you, or made money for you, then please consider making a donation in her name to the Women's Cancer Foundation.


