

Creating a Table of Contents / Index / Table of Figures / Table of Authorities / Table of Tables / Table of Equations That Spans Multiple Word Documents
Note: This is an Article that was created on the Microsoft Answers site that I saved so it could be edited. Despite appearances, it is not on a Microsoft site, now.
Scope: Word 97-2021(365) - any version of Word that can create fields.
Dealing with Fields in Microsoft Word
Prerequisites: Knowledge of how to Insert a Table of Contents, or Index, or Table of Figures, or Table of Authorities, or Table of Tables, or Table of Equations
This is for people who want to have a single document/book, etc. split into multiple files before assembly into one large one. They may be tempted by Word's Master Documents "Feature." (My page explains why this "feature" is to be avoided.)
This is not about continuing Pagination (page numbers) nor Automatic Numbering. These are the subjects of other pages.
This has been written about before but the previous writings are older and do not seem to come up on web searches.
See the bottom of this article for links to those I could find. As far as I know, these methods are unchanged essentially from Word 2000 (XP).
Those older articles may well do a better job helping you than I do with this Article.
The prerequisite requirement is quite real. You need to know how to insert an Automatic Table of Contents using the TOC field before tackling inserting one for multiple documents.
You may want to consider using Boiler - Insert a selection of documents by Graham Mayor, MVP instead of going through this. It creates a large Word document from the files.
The following quotes directly from the archived version of MVP Jonathan West's article on TechTrax:
When using RD fields, the normal approach is to have a separate document that contains your cover page for the entire document set, plus the Table of Contents and whatever other introductory material is needed. So, the first thing you do is create that document.
Now, because the cover page document contains no headings, the Table of Contents will probably display the following text. "Error! No table of contents entries found." Do not panic, this is expected.
The next thing that has to be done is to insert the RD fields. Press Alt/F9 to display the field codes in the document. The TOC field will now look something like this.
{ TOC \o "1-3" \h \z }
Now we have to insert the RD fields. The way to do this is to move the cursor to the end of the document, and press Ctr/F9. A fresh pair of empty field braces will be inserted, looking like this { }.
The cursor will already be positioned between the braces ready for you to type the field details. Type in RD \f chapter1.doc, so that the field looks like this
{ RD \f chapter1.doc } { RD chapter1.docx }
This assumes that the first file you want to reference is called chapter1.doc, and that it is located in the same folder as the cover page document. If your first document has a different name, then set that instead. If there are spaces in the name, e.g. the file is called chapter 1.doc instead of chapter1.doc, then you must put quotation marks round the filename. Make sure that the quotes are not replaced with Smart Quotes when you type them. It should look like this.
{ RD \f "chapter 1.doc" } { RD "chapter 1.docx" }
If you are using Word 97, you will have to leave out the \f switch. The \f switch specifies that relative pathnames are calculated relative to the location of the document containing the Table of Contents, but this option was only introduced in Word 2000. Don't worry about it, we'll deal with that problem later.
Insert as many RD fields as you need. They must be inserted in the order in which you want them to appear in the Table of Contents. When you have finished, it will look something like this.
{ TOC \o "1-3" \h \z }
{ RD \f Chapter1.doc }
{ RD \f Chapter2.doc }
{ RD \f Chapter3.doc }
Now you are ready to update the Table of Contents. Press Alt/F9 to toggle the field codes. The RD fields will disappear (unless you are displaying hidden text from Tools/Options/View). Position the cursor on the Table of Contents and press F9 to update this field code. The Table of Contents will now contain entries for all the other documents.
Unfortunately, what has probably happened is that the page numbers on each document start at page 1, so the Table of Contents looks a real mess with the page numbers starting afresh at each document. You probably want the pages to be numbered consecutively throughout the document. If the cover page file including the TOC is 5 pages, then you want chapter1.doc to start at page 6.
To do this by hand is cumbersome, but do-able if you don't have too many separate files. Open chapter1.doc, and then go to Insert/Page Numbers. The following dialog will appear.
Click the Format choice and the following dialog will appear.
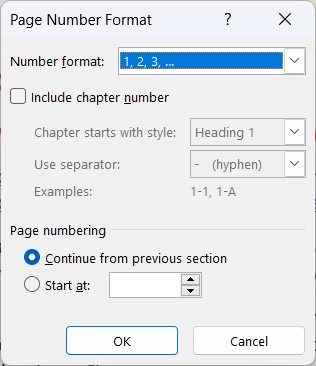
Click the Start at button, and enter 6 in the box to the right of it (or whatever you want as your starting page number), and then click OK to close the dialog. The Page Numbers dialog will have changed to that it now looks like this. (Note: The Cancel button is now a Close button.)
Click Close to clear the dialog. Don't click OK, as this will insert page numbers into the header. I'm assuming that the page numbers are already there and you don't need another set!
Now you need to move to the end of the document to find out the page number of the last page. Write it down, you will need it in order to set the starting page of the next chapter. Now save and close chapter1.doc.
You then open Chapter2.doc and repeat the whole process, adding 1 to the page number of the last page of current chapter, in order to set the starting page for the next chapter. Once you have been through all the chapters, you can then update the Table of Contents again, and provided you have made no mistakes anywhere, the page numbers in the TOC will all be straightened out.
As you can see, this is a somewhat laborious process if you have more than 2 or 3 documents in the set. Fortunately, this process is an ideal candidate for a bit of automation; and just to make life easier for you, I have written the macro that does this. (The code for this is also in the TechTrax Library, if you want to download it and import it directly into your template.)
Sub UpdateTocAndPageNumbers()
Dim oField As Field
Dim strCode As String
Dim iLastPage As Long
Dim oDoc As Document

ChDir ActiveDocument.Path
With ActiveDocument.ActiveWindow.View
    .ShowAll = False
    .ShowHiddenText = False
    .ShowFieldCodes = False
    .Type = wdPrintView
End With
ActiveDocument.Repaginate
Selection.Move unit:=wdStory, Count:=1
iLastPage = Selection.Information(wdActiveEndAdjustedPageNumber)

For Each oField In ActiveDocument.Fields
    If oField.Type = wdFieldRefDoc Then
        strCode = Trim$(oField.Code)
        strCode = Trim$(Mid$(strCode, InStr(strCode, " ")))
        If LCase$(Left$(strCode, 2)) = "\f" Then
            strCode = Trim$(Mid$(strCode, 3))
        End If
        If LCase$(Right$(strCode, 2)) = "\f" Then
            strCode = Trim$(Left$(strCode, Len(strCode) - 2))
        End If
        If Asc(strCode) = 34 Then
            strCode = Trim$(Mid$(strCode, 2, Len(strCode) - 2))
        End If

        ChDir ActiveDocument.Path
        Set oDoc = Documents.Open(FileName:=strCode)
        oDoc.Activate
        With oDoc.ActiveWindow.View
            .ShowAll = False
            .ShowHiddenText = False
            .ShowFieldCodes = False
            .Type = wdPrintView
        End With
        oDoc.Sections(1).Headers(wdHeaderFooterPrimary). _
                 PageNumbers.RestartNumberingAtSection = True
        oDoc.Sections(1).Headers(wdHeaderFooterPrimary). _
                 PageNumbers.StartingNumber = iLastPage + 1
        oDoc.Repaginate
        Selection.Move unit:=wdStory, Count:=1
        iLastPage = Selection.Information(wdActiveEndAdjustedPageNumber)
        oDoc.Close SaveChanges:=wdSaveChanges
    End If
Next oField
ChDir ActiveDocument.Path
ActiveDocument.Fields.Update
End Sub
You run this macro when your cover page document is open. It does the following:
Sets the document so that hidden text and field codes are not displayed. This makes sure that page numbers displayed on the screen match what will be printed.
Repaginates the cover page document, and finds out the page number of the last page.
Finds each RD field in turn. For each field it does the following:
a. opens the associated document,
b. sets the starting page to the appropriate value,
c. repaginates the document,
d. finds out the page number of the last page,
e. saves and closes the document.When all the RD fields have been processed, it updates the fields in the cover page document, including the Table of Contents.
You may need to run this macro twice, initially. This is because the process of updating the Table of Contents may change the number of pages in the cover page document.
The macro will work even for Word 97, where you don't have the \f switch within the RD fields options. If this is the case, you must have all the documents of the set in the same folder. I'd recommend that you do this, anyway.
The same trick can be used to prepare a consolidated index. For the document that contains the INDEX field, you place the RD fields in the same document, but this time you put the RD fields in front of the INDEX field, so they look like this
{ RD \f Chapter1.doc } ( RD Chapter1.docx }
{ RD \f Chapter2.doc } ( RD Chapter2.docx }
{ RD \f Chapter3.doc } ( RD Chapter3.docx }
{ INDEX }
If the Index is preceded by a heading, then the cover page document should include an RD field for the index file, so that the index heading is included in the Table of Contents. You don't need the same RD field in the index file, as it would then be referencing itself.
Once the documents have all been repaginated using the macro above, you can then open the index document and update the index one final time to make sure the page numbers are correct. Then save and close the document.
Now, there's one last thing that you might need to do in a hurry—print the complete document set, in the correct order of chapters. You can open each document in turn and print it, but there's lots of scope for getting it wrong. Fortunately, this can be automated as well. The following macro will do the job. Make sure your laser printer is well stocked up with paper, and that the cover page document is open, and then run this macro.
Sub PrintMultiFile()
Dim oField As Field
Dim strCode As String
Dim oDoc As Document

ChDir ActiveDocument.Path
ActiveDocument.PrintOut Background:=False

For Each oField In ActiveDocument.Fields
    If oField.Type = wdFieldRefDoc Then
        strCode = Trim$(oField.Code)
        strCode = Trim$(Mid$(strCode, InStr(strCode, " ")))
        If LCase$(Left$(strCode, 2)) = "\f" Then
            strCode = Trim$(Mid$(strCode, 3))
        End If
        If LCase$(Right$(strCode, 2)) = "\f" Then
            strCode = Trim$(Left$(strCode, Len(strCode) - 2))
        End If
        If Asc(strCode) = 34 Then
            strCode = Trim$(Mid$(strCode, 2, Len(strCode) - 2))
        End If
        ChDir ActiveDocument.Path
        Set oDoc = Documents.Open(FileName:=strCode)
        oDoc.PrintOut Background:=False
        oDoc.Close SaveChanges:=wdDoNotSaveChanges
    End If
Next oField
ChDir ActiveDocument.Path
End Sub
By the way, if your printer is capable of printing duplex, make sure that duplex printing is switched off before you run this macro. Each file will start on a fresh sheet of paper; and so, if you are printing duplex, there may be a few blank pages if an individual chapter has an odd number of pages. Print it all non-duplex, and then photocopy onto duplex if needed.
=================================================
This is the END OF JONATHAN WEST Material
=================================================
Notes by Charles Kenyon
This code will briefly show each document on the screen. Be patient and let it run.
Edits to Jonathan West material by Charles Kenyon
September 2024: In recent trials, I have been using all chapters in the same folder without the \f switch.
I added notation in Italics of fields without that switch. No path is included in the field. I also added the "docx" extension rather than the "doc" extension for filenames.
Toggling Field Code Display Shortcuts
In Windows versions you can use the keyboard shortcut Alt+F9.
On the Mac, the shortcut is Opt+F9.
In both operating systems you may need to add the Fn key to the shortcut on many computers.
References:
Create One One Table of Contents From Multiple Word [2010] Documents
Master Document Substitute by Dian Chapman and Susan Daffron
Word Fields: Part I | Microsoft Docs by Cindy Meister (look at part on Long Document Management)
Creating a Table of Contents Spanning Multiple Documents by Jonathan West
Using RD Fields With Chapter Headings (Automatic Numbering) by Allen Wyatt
Important for packaging or moving a group: Word Fields and Relative Paths to External Files by Paul Edstein
How to create a table of contents in Microsoft Word by Shauna Kelly - 4. How to Create a Table of Contents for Several Documents