by Charles Kyle Kenyon
jump to Word Shortcuts for the Month
This article continues from Headers and Footers and Letterhead Part I and Part II. Although it is not required to understand this article, you may benefit from reading those articles first. This month we'll look at the Header and Footer Toolbar and its buttons. I'll point out some things wrong with it and how to fix them. Finally, we'll examine the AutoText entries on the toolbar and think about improving on them.
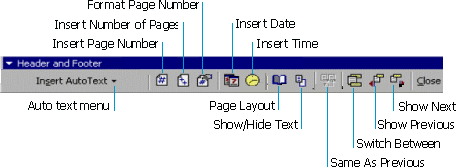
First, don't think you have to memorize the captions shown above. When you are using the toolbar (if you have Word set to display tooltips, the default setting) Word will give you a name for any button when you put your mouse pointer over the button for a few seconds.

This isn't really a button (or even a menu) but rather a drop-down list. We'll get into its contents when we get to AutoText.
Inserts a { PAGE } field which displays the number of the current page.* If inserted using the button, this will be inserted in the Page Number character style - which may be different from your footer style and a bit disconcerting. You may prefer to press Ctrl+F9, type "Page," and then press F9 to display the page number. This avoids the character style.
Inserts a { NumPages } field which displays the number of pages in the document. * If inserted using the button, this will be inserted in the Page Number character style - which may be different from your footer style and a bit disconcerting. You may prefer to press Ctrl+F9, type "NumPages," and then press F9 to display the number of pages. This avoids the character style.
Opens the Page Number Format dialog box so that you can use Roman numerals, start on a different page, etc.
Inserts a { DATE \@ "M/d/yy" } field, which is probably not what you want. It will give you the current date (at the time of printing or opening the document - whichever is later) in the format 12/31/01. A better option for this is to insert a { CREATEDATE \@ "MMMM d, yyyy" } field - or whatever your preferred format is. Other options would be the { SAVEDATE } and { PRINTDATE } fields. See How Do I Insert a Date in Word? for more on date fields and formats. If the date is typed in the body of the document anywhere, my preference is to use a { STYLEREF } or { REF } field to pick up that date for the header/footer. That way you don't end up with one date in the body of the document and a different date in the header/footer. See Styles in Letterhead and Headers and Footers for details.
Inserts a { Time \@ "h:mm AM/PM" } field, which is probably not what you want. This will give you the current time (at the time of printing or opening the document - whichever is later) in the format 9:30 AM. Again, you might want to use one of the other date fields with your preferred format for this instead.
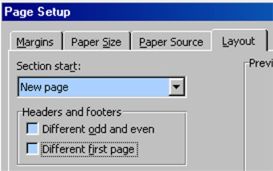
Opens the Page Setup dialog box (just as if you had gone to File => Page Setup => Layout). This lets you change things that alter the header/footer such as "Different first page" or "Different odd and even."
The default status is to show dimmed text when viewing the headers and footers. If you find this distracting, you can click this button and the dimmed text will disappear from view until you either click on the button again or close the header/footer view.
If there is a section following the one in which you want to make a change you have to do it in that section as well unless you want your change to carry into that section. Moreover, Same as Previous is independent for each header and each footer you have (so you have to change it up to six times in each section where you want it changed).7
The default setting for this is depressed so you will likely see it clicked (right). If it is not enabled (you can't click it) you are in the first (only?) section in your document. Each section in a document can have up to three sets of headers and footers: a general set, a first-page set, and an odd-page set. See Headers and Footers, Sections and Section Breaks for more information on this.
This switches between the header and footer of the same type in the same section (the header and footer that would appear on the same page. If it is depressed, you are in the footer.
These two buttons will take you to the next header or footer for your document, assuming that header or footer is active. By "active" I mean that it is displayed on a page. As was stated previously, each section of a document can have up to three different sets of headers and footers. If a section has all three types but only has one page, only the first-page header and footer will be available for editing. If you have multiple sections, this will move you to the next or previous section if there are no more headers/footers in the current section.
You may not have noticed, but the Header and Footer toolbar doesn't have the regular close box found on other toolbars (and windows). Instead, it has a Close button on the toolbar. Earlier versions of Word (prior to Word 97) had both, which caused all sorts of problems. The Close button not only closes the toolbar, but also the header/footer view. When you click on the Close button, you will be returned to the view you were in before you selected "Headers and Footers" from the View menu.
| AutoText Entry Name | Actual fields (and supporting text) |
| - PAGE - | [tab]- {Page} - * |
| Author, Page #, Date | { AUTHOR }[tab] Page {Page} [tab] {DATE}** |
| Confidential, Page #, Date | Confidential [tab] Page {Page} [tab] {DATE}** |
| Created by | Created by { AUTHOR } |
| Created on | Created on { CREATEDATE }** |
| Filename | { FILENAME } |
| Filename and path | { FILENAME \p } |
| Last printed | Last printed { PRINTDATE }** |
| Last saved | Last saved { SAVEDATE }** |
| Last saved by | Last saved by { LASTSAVEDBY } |
| Page X of Y | Page { PAGE } of { NUMPAGES }* |
* Page X of Y (using the PAGE and NUMPAGES fields) has been buggy (although improving) through the various versions of Word. The extent to which these fields work (don't work) as well as workarounds available differs depending on your version of Word including which patches you've applied. See Page X of Y doesn't work! or "Page X of Y" displays or prints as "Page 1 of 1," "Page 2 of 2," or "Page 2 of 1" if these fields aren't working for you.
** See Using Date Fields in Microsoft Word for more on different date fields and formatting them. Once you have the field you want, you can add your own AutoText entries. Again, add them in the Header style if you want them to show up on your AutoText button in your headers and footers.
You can change the header/footer toolbar so that it works better for you. You would want to do this in a global template other than normal.dot so that your changes would be portable. See Customizing Word - Part III for more information on changing toolbars and creating global templates. What follows assumes that you have absorbed the material in that article and looks at special problems / opportunities when working with the header/footer toolbar.
First, before you start messing with the toolbar create any AutoText entries you'll want. I would suggest ones for your page number and number of pages buttons that do not carry the "Page Number" character style. These will be the fields suggested above. You could also create an AutoText entry for your preferred date field (or even the StyleRef field). Save these AutoText entries in your global template. The page number fields don't need to be in the Header style since we'll be using them with buttons rather than from the AutoText list. You may want to give the AutoText entries names, though, that won't pop up in your ordinary typing so that you aren't inadvertently inserting page numbers in your documents.
Second, I recommend creating a new toolbar named "Header and Footer Toolbar Changes" for your use in preparing buttons for the built-in toolbar. This will make it much easier for you to move your changes to a different template in the future.
Third, you need to be in the Header and Footer view to access the toolbar. If you try to make any changes to the toolbar from any other view, you won't be able to find it! While in the Header and Footer view, open the Customize dialog box (Tools => Customize...) and display your custom "Header and Footer Toolbar Changes" toolbar (that doesn't have anything on it yet).
Fourth, with the commands tab on top and showing that you are saving these customizations in your global template, Find the AutoText category on the left side. Then find your AutoText entries in the right window and drag them to your custom toolbar. Right-click on the Header and Footer toolbar button for page number and copy that button image. Paste it on the AutoText entry on your custom toolbar. Do the same thing for the Number of Pages and the Date buttons. Right-click on each of your buttons and rename them if you want so that the names are more meaningful. Don't worry about the names being too long for your toolbar right now; type what you want.
Fifth, in the Customize dialog box, go to the bottom of the left window to find the "New Menu" category and drag a new menu from the right window onto your custom toolbar. Right-click on this and rename it "Pulled from Built-In." Next, holding down the Ctrl key, drag your AutoText entries from your custom toolbar to the Header and Footer Toolbar and put them next to the buttons they are replacing. Then drag the buttons being replaced and put them on your "Pulled from Built-In" menu.
Sixth, right-click on each of your AutoText commands on the Header and Footer toolbar and check "Default style" for the display. Your names will disappear and you'll be left with functioning buttons. You can close the Customize dialog box now.
Seventh, you don't really want to be using your custom toolbar, only the changes you made to the built-in one. You can close it and close the header and footer view in your template. Save your global template. You can add three macros to your global template to keep this custom toolbar out of your way if you want. They are as follows:
Sub AutoExec()
    ' Disable custom toolbar upon loading global template
    CommandBars("Header and Footer Toolbar Changes").Visible = False
    CommandBars("Header and Footer Toolbar Changes").Enabled = False
End Sub
Sub AutoOpen() ' Enable custom toolbar when editing global template CommandBars("Header and Footer Toolbar Changes").Enabled = True End SubSub AutoClose() ' Disable and hide custom toolbar when done editing global CommandBars("Header and Footer Toolbar Changes").Visible = False CommandBars("Header and Footer Toolbar Changes").Enabled = False End Sub
Well, that concludes our work with Headers and Footers and letterhead, at least for now! Please let me know if it has been useful to you.
See also Chapter 19 in Microsoft Word 2010 Bible by Herb Tyson, MVP for info on Word 2007 and Word 2010
|
Key |
What |
| Ctrl+SpaceBar | Remove character formatting |
| Ctrl+Q | Remove direct paragraph formatting. |
| Ctrl+Shift+S | Style Dropdown or dialog |
| Ctrl+* | Show All non-printing characters toggle |
I don't recommend applying direct formatting, especially in templates. Instead, use styles and modify the styles to meet your formatting needs. Your documents will be much less bulky and less prone to corruption. There are character styles for Italic and bold: Emphasis and Strong. That said, some key combinations for directly applying formatting are:
|
Key |
What |
| Ctrl+B | Toggle bold formatting |
| Ctrl+Shift+H | Toggle hidden formatting |
| Ctrl+I | Toggle Italic formatting |
| Ctrl+U | Toggle underscore formatting |
| Shift+F3 | Change Case |
| Ctrl+Shift+K | Small Caps |
| Ctrl+Shift+A | All Caps |
| Ctrl++ | Superscript |
| Ctrl+= | Subscript |
| Ctrl+> | Grow Font |
| Ctrl+< | Shrink Font |
| Ctrl+] | Grow Font 1 pt. |
| Ctrl+[ | Shrink Font 1 pt. |
Headings are a special kind of style and are built into Word at the foundation level. Here are some of the keys for them:
|
Key |
What |
| Alt+Shift+Left Arrow | Create or promote heading |
| Alt+Shift+Right Arrow | Create subheading or demote current heading. |
| Alt+Shift+Up Arrow | When in Outline view, move current heading up. |
| Alt+Shift+Down Arrow | When in Outline view, move current heading down |
| Alt+Ctrl+1(-9) * | Heading Style 1(-9) |
* In Europe Alt+Ctrl+4 has been appropriated for the Euro symbol.
If you want to try getting the keyboard shortcuts all at once, you can take a look at the Microsoft Knowledge Base for Word 97, Word 98, or Word 2000. You can also print the keyboard shortcuts on your computer (including your custom keyboard shortcuts) by picking keyboard commands on the Print dialog box under Print What? (instead of document). The WOPR utilities have a command to create a document showing all keyboard shortcuts (as well as their source).